Thursday, September 18, 2014

Mustache Mugs (Only Available On Custom Order)

I love mustaches. Whether they are on boxes, shirts, worn as jewelry or MUGS. I've received a lot of orders for mustache gift mugs from time to time. They are so much fun to make. Today i will share collection of my mustache mugs which have sold out (but you can still place custom order for them here). 

#1 Mr. Mustache Mug:


For this mug i decided to make white box with neon filling inside &
cute white tag with "Mr." written on it. Neon yellow yarn used for final packaging.^

*******************

 #2 I "mustache" you (Orange version):


This can be gifted to your boyfriend on his birthday x> It comes in golden
box with cute orange customizable mustache tag.

****************

#3 Valentines Day Special Mustache Mug:


This mustache mug comes in painted box and is filled
with chocolates & diamond shape tag.

************

#4 For Your Dad's Birthday:


Can be customizable according to desired color and design^

************


Here is another version of it x>, cute right?^

**********

#5  I Mustache You (Pink Version):


My gift mugs are fun and washable. You can have tea in it everyday
and the design won't come off.  ^

***************

Tips For Using My Gift Mugs:

#1 Do not microwave them with tea or milk.
#2 Designs are washable but DO NOT rub the designs harshly using rough surface.
#3 DO NOT resale my mugs please.

*************

How To Place Mug Order?:

You can Print this out or save with you for your guidance^


**************

What you will get with Gif mug?

#1 Custom Design of your choice with colors on mug
#2 Custom Mug Gift Box 
#3 Custom Gift Box Props
#4 Custom Gift Tag

********
For placing order kindly message me here.

Thanks for letting me share my adorable mustache gift mugs. Next time I will be sharing,
some more new products x>.

Until next time,
Takecare,

Comment
Subscribe
Share
Request

Email me at : saoirsechic@ gmail.com

xo,
saoirse


Tuesday, September 16, 2014

Tips On: Portraits And Posing !

These days everyone wants to pose like a model and take some vogue inspired shots. But what most photographers/models lack is soul in their photographs. The picture won't feel right if your heart is not in it. One thing i've learned from 3 years of dozens of photoshoots i've done is; you can never stop at one point and be like "Now i've reached perfection and i'm perfect at what I do". It's a life learning process and your knowledge is never enough. From every shoot, i've learned so many perks of posing, modeling and how to use props in photoshoots. Today i will share some fun things that i've learned as a portrait model in 3 years.


#1 Wear Lots of Colorful Accessories:


(This photo taken from f9 Photography by Sumaira Khan)

Wearing accessories can be fun especially for adding some color to 
dull photographs. Plus accessories also work as diversion in photography.
Empty wrists can look plain dull when doing some portraits or
posing as model. Make sure you wear necklaces and some bracelets 
in your next shoot^.

*******************
#2 Try Different Effects On One Picture:


(This photo taken from photography class assignment of Naima Riaz)

The best way to choose what is looking "good" on your 
photo the most is by, trying out different effects on your picture.
And then choosing the right one for your photo.
I edit all my pictures myself and sometimes even edit pictures
from my shoots x>. My editing is strong compared to
photography^. You can add some fun effects
using picmonkey.com. I've used two effects from this site above.

**********************

#3 Use Air For Dramatic Effects:


(This photo taken from professional studio at Avs kumar)

Do not use hair dryer for adding wind effect to your portraits. 
I did that once and all my makeup just melted (like lol yeah).
Make sure you have mini round fan for this otherwise you can
always shoot at very windy day on top of your roof
for better realistic results x>.

*****************

#4 Pose Like A Vogue Model:


(This photo taken from f9 Photography by Sumaira Khan)

The best inspirations to take are from Vogue magazine.
Save some snaps from vogue magazine and carry them with
you on photoshoot. This way you'll remember your poses &
also save time from panicking about what to do
in your photoshoot. 

***********************

#5 Sunlight Technique:


(This photo taken from my summer collection 2014
@style at foot step)

This picture must be looking like it's taken by a professional,
from Dslr right?^. Don't be fooled. It's taken from digital camera.
How I got an amazing shot like this?x>. Simple: Look in direction of sunlight
and take your photo from below. This way "sunlight" acts as natural
lighting and makes your photo look flawless. Add some vintage effects
later on top.

*************
I had fun sharing some of these ideas with you. Hope you enjoyed reading my post. If you want some more ideas or think you could help improve my blog more. You can send your mails here: saoirsechic@gmail.com.

Until next time,
Takecare,

Comment
Request
Subscribe
Share

xo,
Saoirse


Monday, September 15, 2014

Pretty Cute Ear tops^!

Today i'm gonna be sharing my fun packaging for cute ear tops that i'm selling here. The whole process of making these was so much fun. The finish look of my saoirse illustration was satisfying. As i painted these with black acrylic paint. Some new ear tops came in stock, so decided to make fun packaging of these^.

You can buy these ear tops from here.


************


First I painted my illustration on white x>. Result came out quite cute.

***********************


Next I painted these on yellow paper x>.
And even got paper cut from it. When using fresh paper,
be very careful, it tend to be sharp as blade^.

********************


I was not sure after completion of  my illustrations,
that how i'm going to use them as "packaging". When an
idea just popped in my head, why not make saoirse wear these
cute ear tops which are for sale?^.

*******************


Very happy with my illustration packaging.
What do you think?^

***************
I would love to know from you all what you think about my products. If you have some ideas or need some help and tips in designing something? send me an email at: saoirsechic@gmail.com x>. I will be happy to help you & share some fun ideas that might help you break that "creativity block" x>.

Until next time,
Takecare,

Comment
Request
Subscribe
Share

xo,
Saoirse

Sunday, September 14, 2014

Golden Bow Hair Accessory^!

I'm crazy about bows x>. I find them the most fun accessories to wear, to roam around with. I've made dozens of bow products in last 2 years. Each one of them are special. They all have an inspiration behind them^. I select my own fabric, packaging design and the final look for snapshots myself. I will be sharing new bow products from time to time.

You can shop for my golden bow here.


**********************


For my this bow my main inspiration comes from Cleo De Nile,
from Monster High. I love her style, the way she uses bits of gold in her 
accessories. 

*********************


My gold bow is made from fine golden fabric. I love how
gold contrasts so well with pink.^ I decided to take 
some fun shots wearing this bow.

********************


Packaging for my gold bow is inspired by cleopatra & Cleo De Nile both.
I made this illustration myself^.

****************

I had fun sharing my gold bow hair accessory & inspiration. Whenever you are making something make sure , you are very clear about the final look of your product. I'd recommend you to sketch some inspirations first and then go construct them x>. As for my Gold Bow you can purchase it from my page.

Hope to inspire you^,
Until next time,
Subscribe
Share
Request
Comment

xo,
Saoirse


Saturday, September 13, 2014

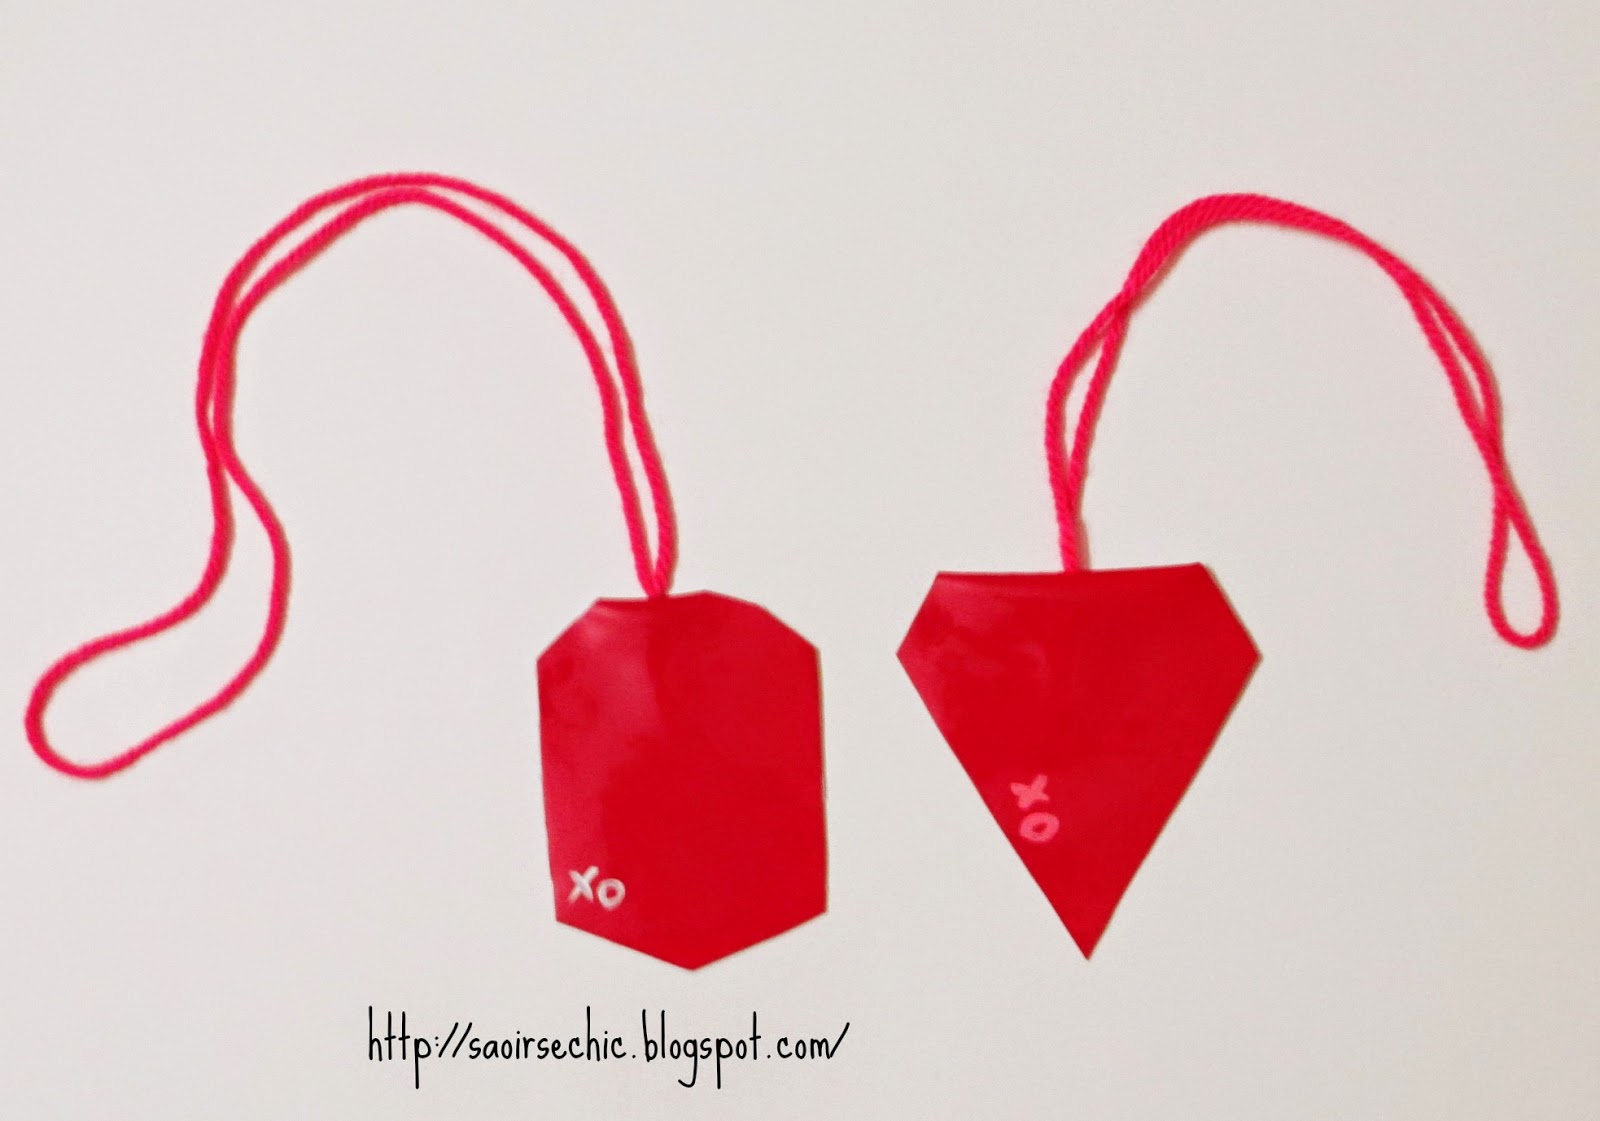
Diamond And Gem Luggage Tags !

For sometime I really lost my mojo to blog about fun things i'm making these days, apologies again x>. But today I finally decided to stood up, motivate myself to share my diamond and gem tags with you. I'm obsessed by diamonds and gems lately.^. You'll be getting to see a lot of diamonds in my coming products.


 Diamond & Gem Luggage Tags:


I wanted to make these for so long time, finally made them.
Made from hard sheet fabric, I hand painted on them^.

*********************


Back side of luggage tags I added "xo", just for fun & to give
back some love to my customer.

***********


Above is demonstration of how you can attach these luggage tags and carry it with
you on trips.^ Big bags and suitcases are fun much.

You can also place order for parrot green version of these x>.

********************

Join my Social Media:
  1. Events/Promotion of Youth/Comedy Page: diaryofseresha
  2. Vlogs, Interviews, Covers, Advice, Art, Comedy: Youtube Channel
  3. Official Instagram: diaryofseresha
  4. Snapchat:  diaryofseresha
  5. Twitter: @diaryofseresha
  6. Inspiring Pins/Life Changing Quotes: Pinterest      
  7. Deviant Art For My Diary Galleries: lovefreek       
  8. Ask.Fm Profile To Pop Your Questions: diaryofsereshachic      
  9. Fashion Blog Instagram: diaryofsereshablog
========================================

 Shop:

Buy cool dope packs originally designed by me: diaryofsereshapacks

Monday, September 1, 2014

Custom Mug Order: NY Inspired!

Last time i did blog post it was August, 24th, 2014. It's been one week since I was away and did not do any entry. I know, none of my excuses for not posting can ever comply to the damage I do, by leaving "My own world" like that for one whole week without any update. But honestly speaking I was going through a very hard time in my life, where I did not felt like touching my keyboard. I'm so glad that it's over and i have healed :>. So here's the deal , if life happens again, I will not go without informing  x> ok?.

Today I will be sharing my whole process of making this custom mug order and box I was working on for days. It's finally delivered and long gone, happy to see my customer happy ^^. People place custom orders for mugs on my this page.(You can place order too if you're interested). They send me details of color, look they want on their customized mugs and I try my best to make exactly how they want it to look like. Thankfully, I never fail and always surprise my customers on the final look of their order, they never leave unhappy x>.


Gifts to me should be precisely taken seriously ^,
and seeing the receiver happy gives me the best feeling ever that i can't explain x>.

*****************

Firstly, I worked on the mug box. Which was a whole process of making the box draft first, 
then I drew the details on the box according to my customer's demand x>.


As you can see here it was all black and white at first , no color 
or detail was added.

****************
My customer wanted the box to have NY buildings at one side,
Custom message on another & the rest of the box to be colourful.


I kept NY buildings at back side, on front side added custom message,
Whereas On left & right sides I added colorful polka dots.

*****************

I left it to dry for 4 hours, then assembled the box.
I painted the top side of box sky blue & added white dots,
Which give it a fun look^.


************


I shaded the back side of box with white, making the buildings look like they
are surrounded by clouds x>. Box back & top side were ready.

*************

For the box front side, it was evident I only wanted the "names"
to have some color, whereas the rest, wanted to keep it black & white.


The box left and right side already had so much color,
That i decided to choose teal blue & pink to contrast with white and blue
for the names.

**********************

It was customer's demand to add "Okay Okay"
(from "fault in our stars") at bottom of mug.^


I loved how the bottom of mug turned out to be x>.

***************

For the mug back side I added Ny inspired buildings in blue color,
according to customer's demand.


*****************

For the mug's front side, I added a quote in black,
It was customized by my customer^. I did not
added it myself.


The mug & box is ready^. It took me 6 days to make this whole
order, because there are always some things which I have to decide myself, my customer only 
gives me the idea of how the order should look like, the rest I implement myself^.
And unless I don't get right feel from my order, I don't paint anything on it.

************************

The best part of making all this was, it turned out exactly like my customer wanted it to look like x>. I had so much fun making this order. Hope all this motivated you in some way to work on your best talents as well.^.
Eventually, working hard and "work" will lead you to something, whereas being lazy and doing nothing can take you nowhere.

If you want to place order for custom gifts for your loved ones^,
You can check out my page and inbox me here:

I'm gonna go now, work on some fun posts and projects 
for the coming days;>,
Until next time,
Take Care,

Comment
Share
Subscribe
Request

xo,
Saoirse


Sunday, August 24, 2014

My New Art Work!

Did I told you I love painting on new different mediums?^. Whether it's canvas, art card, wood, glass or even cardboard (yes x>). I'm so in love with painting on cardboard these days^. It's very much fun & my art work looks so cute on completion x>. I want to show you my two new artwork pieces that i just completed last night:


Angry bear & camera they both look super cute.
Can be hung on wall, used in photo booth or
even scrapbooks x> You can purchase both of my artworks from here.

************


For making this i had to cut out cardboard using very sharp blade,
It was not easy to be honest,
But perhaps was the most difficult part of making it.
*************


I decided to show you in a separate picture because gravely 
my camera on flash quality sucks sorry x>. 
But the original bear 
color is dark brown as you can see.

***************


And my camera x>, I decided to go with mint green & pink^.
*********

I had a lot of fun making these two x> but guess what? i'm working on my 3rd cardboard artwork now ^, which i will reveal soon IA. By the way, after completion of each artwork, the feeling i get is hard to explain it's more than just satisfying x>. Don't think i'm running out of ideas yet, because kids i'm just getting started here ;>. 

Wait till you see my upcoming posts,
I will be posting everyday,
So make sure you check my blog daily x>,
Until next time,
Take Care,

Comment
Subscribe
Share
Request

xo,
Saoirse


Saturday, August 23, 2014

Golden Heart Clutch GiveAway Winner Announced!

Sometime ago, during process of my summer collection 2014, i started a giveaway contest. Which included to comment under my video(You can find it here), your favorite piece from my summer collection 2014. And the best answer was to receive my hand made golden heart clutch x>(yeah it was that easy). I know I got lazy to announce it earlier, but finally i took time & decided to share this anyway x>.By the way thanks for those who participated.
.


Today i will be announcing the winner. The winner is: dania basit x>. Congratz.


It's on it's way to you x>, here is what dania wrote:

"Starting it off its actually really hard to pick just one of my favourites there is like more than one product i like but as per said above i would go with the cat nips series plus an addition to that i would also go with the golden velvet turban and why because the cat nips series has something really unique which is that adorable cats face and everything in it .. the eyes are attractive and that just makes it make me love the thing and the golden velvet turban is really trendy you could style it in anywhere you want too and the golden colour itself would go with alot of colours and would give a different unique look to you outfit apart from others i can't select more things *sigh* but these two are my fav!"
(You can read dania's comment here)

Thank you for taking time to write all this for my products dania x>.
***************
I will be doing another giveaway soon IA,
 Those who did not get a chance to participate in this one x>,
Can always participate in upcoming giveaway,
So stay put ^.
Until next time,
Take Care,

Comment
Subscribe
Share
Request

xo,
Saoirse


Friday, August 22, 2014

And Death Came

One of the healthiest ways to express your emotions and thoughts is to put them in conceptual photo shots. I get a lot of visions, dreams from time to time, which do not seem to be that "bright" but often include very scary, macabre visuals. As an artist it is very important to not only focus on "positive" ideas, but also "negative" emotions which tend to get stuck inside us and fathom poisonous results in the end. What i am about to reveal is the "depth" part of me, which i only express through psychedelic photographs^. Now i don't own a "Fancy" professional camera nor have much knowledge about "professional" photo editing. But i sure do know basics of adobe & can manage to put out exactly the kind of concepts i have in my head. This is again very important!. When you are an artist of any kind, it does not matter whether you have less or more skills, what matters the most is how well you can express those ideas in your mind in a visual form even when you have limited knowledge/materials. And that's the beauty of being an amazing artist.

Today i will tell you how i edited my conceptual art photos & share story behind each of them.

#1 "And She Never Sleeps":

I wanted to do a shot portraying anxiety problems, 
this one is very close to my psyche which only the artist
can understand ^.


How I edited Back ground picture?^

For this shot, i found a horror looking photo randomly from google images,
And used it as background on first layer.^ Now the moon & graves you see in the background picture
(showing from window) were added using picmonkey,  This site has awesome collections of stamps that you can use in your pictures.

*****************

How I edited my layer#2 Picture ?^

It was easy, first i took a photo of myself on self timer, 
I already had the concept & final outcome of picture in my head,
So it was easy for me to know what type of pose i really wanted.


As you can see the picture was taken in my room 
& was nothing special about it^lol

****************

Next I added some effects using picmonkey, 
changed my lip & eye color. Using magic tool brush at adobe photoshop,
I simply removed the eecky background & separated it from my main photo.
Next, i saved my photo to .png format & added it to my main "scary" background.


********************
There it is my conceptual photo is ready x>.
I like to add some writings with my photo too which defines
what i'm trying to express in them.You should add some writings too with your art.
When your words are required with visuals, 
but you don't add them along, 
then your art becomes meaningless. Read below for my words:


"There's a feeling I get when I look to the West,
And my spirit is crying for leaving...
In my thoughts I have seen rings of smoke through the TREES,..
And the voices of those who stand looking..."

(Excerpt taken from "Stairway To Heaven" by led zeppelin)
********************

#2 "The Kill":

For my next photo I am not trying to portray i'm "Dying" or anything,
But there is a very strong message behind my this concept.


***************
The original photo looked like this^.
I took it on self timer, added blood stains using picmonkey.
I used vampire effect again using picmonkey,
& then blended the unwanted background behind me using "smudge" tool,
in adobe photoshop.
Simple x>


**************
The concept is again very close to my psyche,
It tells a story going on in my head about everyone's conscience.
Some people might say i'm trying to portray myself "dead" here,
but that's just a hasty judgement of my portrayal.
A message is deep,
It's about how we as people sell our souls,
& become slaves to money, fame & later regret on our decision.
It's about death of our own conscience.


"What if I wanted to break?,
Laugh it all off on your face,
What would you do?...

What if I fell to the floor,
Couldn't take all this anymore..
What would you do?,....

Come break me down,
Bury me, Bury me,..
I am finished with you......"

(Excerpt taken from "The Kill" by 30 Seconds To Mars) 

************

So this is how I express myself in visual & words. Hope you'll learn to try to express your negative emotions like anger, sadness, depression, pain in such healthy way too!.It's always best to get these feelings out & not bottle them in you. If there's a will, there's a way x>.

Thanks for letting me share my conceptual art experience^,
I will be sharing more photo concepts IA,
Until Next time,
Take Care,

Comment
Share
Subcribe
Request

X,
Seresha


Thursday, August 21, 2014

Wool Ball Hair Band!

When you're an artist of any kind. Whether you're a designer, singer , actor or even model, you & your work will always be criticized. Normally people who are jealous from you tend to give you advices to change your style and take out faults in your work. It's really hard for any artist to accept this, as we tend to be very emotional, sensitive in our work matter. Especially me, I create things from my heart. If i won't feel from my heart while making something then i won't even make it!. I get messages from random people inboxing me on facebook that they have problem with my hairs, my make up, crazy things I create, but what they really find hard to accept is the fact that no matter what they will say "I can't change myself just to make all these people happy". I know now exactly how these celebrities feel, because I have to deal with all these so much hurtful comments, criticism every single day. So it's my request everyone, do not use harsh words and criticism for anyone. Appreciate art, work of everyone whether it's good or bad. Just be in shoes of an artist for a moment yourself and think, if the same harsh words coming out of your mouth for someone's work is used for your creations then how will it feel to you?.Of course you will not tolerate, no one does.

I really felt obliged stating above few lines for starters, so hope everyone will understand the love for an artist's work. Now for the good news, I will be doing two posts today, since yesterday i did not posted anything i know x>(Double Penalty-spare me lol). Today I am going to share my inspiration and experience making this wool ball hair band.


I love making unique crazy accessories that can define you from a
crowd in a distance. Like this wool ball yarn wrapped hair band.
**************


I saw an illustration by elsie larson wearing a wool ball like accessory on head,
It popped to me, why not make wool ball head wear?;>
*****************

That's bratz doll, a thrift find ^ perfect for displaying my head wear! 

Process of making this wool ball hair band was a toughie,
first i wrapped the hair band base with hot pink yarn,
then i made newspaper ball, wrapped it with yellow & hot pink yarn,
Stitched it with my hair band base.
Wool ball hair band was ready ^^.
Whole process took me 3-4 days for making this wool ball hair band!
*****************


And by the way for my makeup inspiration x>,
I took it from this photo for my wool ball shots ^!

****************

This wool ball hair band got sold out at my stall, It was one of the best feelings ever x>. Honestly, i did not expected this to happen but it shows, apart from haters, there are people in this world who love and appreciate my accessories that i create irrespective of how crazy they might look. It's just the beauty of it, an ordinary person won't ever understand.

Hope you'll learn something from all this,
And keep creating unique things,
Irrespective of the fact,
What others might tell you to do,
Don't let anyone's views bother you^,
Until next time,
Take Care,

Comment
Subscribe
Request
Share

xo,
Saoirse