Showing posts with label DIY: Crafts. Show all posts

Friday, April 22, 2022

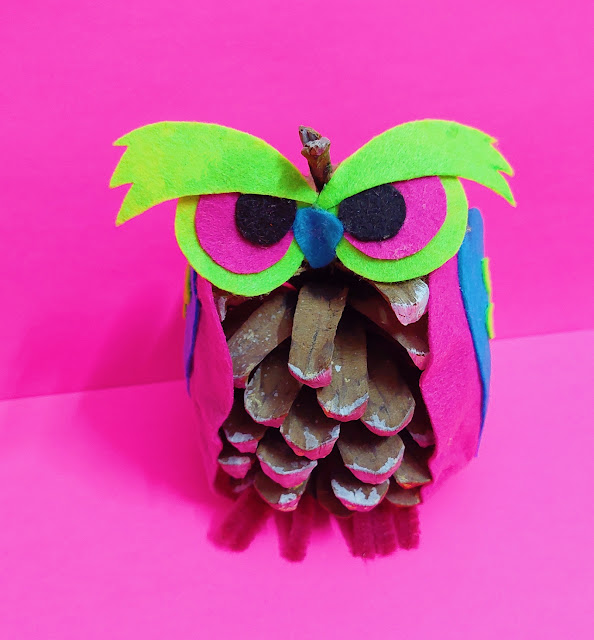
DIY: Pinecone OwL!


Hi ya all!. I made this cute Pine cone owl using bits of felt pieces. This was super easy to make and I shall be sending this owl in my brand new pack here. If you want to learn how to make this pine cone owl yourself, here is step by step tutorial below from this site.


Also here are the drafts you can print out for cutting the pieces on felt:
Hope you liked this simple diy. Until next time.
Take care <3,

-diaryofseresha

================================================
 
Join my Social Media:

Dark Socials:
  1. Facebook Page: diaryofseresha
  2. Channel 1: Youtube Channel
  3. Tiktok: diaryofseresha
  4. Official Fashion Instagram: diaryofseresha
  5. Snapchat:  diaryofseresha
  6. Twitter: @diaryofseresha
Colorful Socials:
  1. Inspiring Pins/Life Changing Quotes: Pinterest      
  2. Deviant Art For My Diary Galleries: lovefreek       
  3. Ask.Fm Profile To Pop Your Questions: diaryofsereshachic      
  4. Private Blog Instagram: diaryofsereshablog
Swag/Comedy Socials:
  1. Tiktok for comedy: diaryofsereshaswag    
  2. Swag/Vlog Instagram: diaryofsereshaswag
  3. Vlogs/Comedy Youtube Channel: diaryofsereshaswag
========================================

 Shop:

Buy cool artworks, clothing originally designed by me: RedArtCult

For PR/Collab/Queries:

Email me at: diaryofseresha@yahoo.com
xx
 

Wednesday, July 26, 2017

Diy: Cardboard Buildings Artwork

 Here is a basic card board art work I made. For this all you need are some paints, scissors and a card board piece which can be taken from milk box carton.
Instructions:
  1.  Draw cool buildings art work using pencil.
  2. Then paint the building base black using mixture of acrylic and poster paint.
  3. Do the outlines of the buildings using white paint(This will give it chalkboard effect).
  4. Cut out the edges using sharp scissors(You need to have practice for cutting card board neatly or you can opt using cutter or laser too. I prefer cutting all my art works using normal scissors since I have a lot of practice. I am creating arts from past 7 years).

Final cardboard art work will look like this. You can write fun message behind this and gift to someone or keep it on your mantle piece for decoration.

Coming up with lots of new diys for you!
xx
-Seresha

Tuesday, February 2, 2016

DIY: Heart Cut Outs (make these in 2 simple steps)

Yo! Guys. Check out these pretty heart cut outs for valentines day. You can use these in card, as scraps in scrapbook or diary. You can also use these as stickers on your gift packaging. There are dozen of ideas you can utilize them in.  I will teach you right now this very instant of how to make these in 2 simple steps.

Materials:
  1. Glitter Sheet
  2. Uhu Glue Tube
  3. Scissors
  4. Heart and arrow drafts( Find them right here and here)
Instructions:

Step#1:
Draw heart and arrow drafts on glitter sheet & cut them out.

Step#2:
Paste the arrow on top of heart using uhu glue.


*Done*


-Seresha
X

================================================

Join my Social Media:

Events/Promotion of Youth/Personal Development Page: Facebook

Vlogs, Interviews, Covers, Advice, Art, Comedy: Youtube Channel

Color Pantone Stories: Instagram

Inspiring Pins/Life Changing Quotes: Pinterest

Comic Art Series: Instagram 
          
Deviant Art For My Diary Galleries: lovefreek       

Ask.Fm Profile To Pop Your Questions: @diaryofsereshachic       

========================================

 Shop:

All kawaii/Quirky/Vintage/Recycled Products: Handmade Art Shop

Handmade Kawaii Shop Facebook Page: Handmade Art Shop

Friday, January 29, 2016

DIY: Snow White Poison Apple (Part:1)

Yo! Guys. I want to share this rad snow white poison apple diy crack with you. I was always so much intrigued by "Poison Apple", I thought it would be cool to make one. But chics, don't be too hasty. This is just part:1. I will be sharing part:2 of this DIY soon.


Materials:
  1. Fake plastic apple
  2. Glitter
  3. UHu Glue
  4. White Pencil
  5. Red Acrylic Paint
  6. Lacquer Spray
Instructions:

Step#1:
Paint up your apple red. This is important to do, because originally plastic apple tends to be glossy/shiny in color and we don't want that my friends.

Step#2:
Using white pencil draw the poison apple's face.(Just like the one you saw in snow white).

Step#3:
Add uhu glue & bit by bit start sprinkling glitter on the glue part.
Step#4:
Once the glue is dried. Spray lacquer as finishing coat.


*Done*

Keep this apple safe.
I will teach you in Part:2,
What exactly you need to do next ;>.

Any questions you have?
Leave in comments, 
I will answer you happily.

xoxo,
-Seresha

================================================

Join my Social Media:

Events/Promotion of Youth/Personal Development Page: Facebook

Vlogs, Interviews, Covers, Advice, Art, Comedy: Youtube Channel

Color Pantone Stories: Instagram

Inspiring Pins/Life Changing Quotes: Pinterest

Comic Art Series: Instagram 
          
Deviant Art For My Diary Galleries: lovefreek       

Ask.Fm Profile To Pop Your Questions: @diaryofsereshachic       

========================================

 Shop:

All kawaii/Quirky/Vintage/Recycled Products: Handmade Art Shop

Handmade Kawaii Shop Facebook Page: Handmade Art Shop

Thursday, January 21, 2016

Cardboard Pineapple for your room and doll house

Hello there. Check out this cool idea for you and your room. Make two pineapples from cardboard for you and your doll house. 


I made a giant one for my room and the 2nd one for my doll house.
It looks cool. What you think?>.

-Seresha
X

================================================

Join my Social Media:

Events/Promotion of Youth/Personal Development Page: Facebook

Vlogs, Interviews, Covers, Advice, Art, Comedy: Youtube Channel

Color Pantone Stories: Instagram

Inspiring Pins/Life Changing Quotes: Pinterest

Comic Art Series: Instagram 
          
Deviant Art For My Diary Galleries: lovefreek       

Ask.Fm Profile To Pop Your Questions: @diaryofsereshachic       

========================================

 Shop:

All kawaii/Quirky/Vintage/Recycled Products: Handmade Art Shop

Handmade Kawaii Shop Facebook Page: Handmade Art Shop


Monday, January 18, 2016

Diy: Miniature Birdie

Yo! Guys.  Today I want to share with you this quirky-cute idea of making a miniature version of your bigger project. Few weeks ago I shared a "Bird Necklace" diy, which you can read about right here. I decided to make a mini version of it. How cool will that look?.

Since my childhood I have always been so much fascinated by miniature or tiny items. I also decided to build myself a doll house made all out of cardboard. Last year, I have shared the 1st construction idea of my doll house with you. So this year 2016, I will be sharing further miniature ideas with you :D. I can't wait.


For making this cute-tiny birdie, which you can wear as necklace or just have it as doll house keepsake. Simply, create tiny template version of the bigger birdie. Trace the draft on felt, cut them out & paste them together. 


*Done*

Here is a cool idea for you all to try: Create miniature versions of all your bigger projects :D.

-Seresha
X

================================================

Join my Social Media:

Events/Promotion of Youth/Personal Development Page: Facebook

Vlogs, Interviews, Covers, Advice, Art, Comedy: Youtube Channel

Color Pantone Stories: Instagram

Inspiring Pins/Life Changing Quotes: Pinterest

Comic Art Series: Instagram 
          
Deviant Art For My Diary Galleries: lovefreek       

Ask.Fm Profile To Pop Your Questions: @diaryofsereshachic       

========================================

 Shop:

All kawaii/Quirky/Vintage/Recycled Products: Handmade Art Shop

Handmade Kawaii Shop Facebook Page: Handmade Art Shop